Showing posts with label Ubuntu. Show all posts

Ubuntu One Storage File onLine

12:49 AM

(1) Comments

Ubuntu One Storage File onLine
 Ubuntu One in the beginning is an online storage service that is integrated with the OS ubuntu. This service was later extended its use to the Windows OS, Android and iPhone. Ubuntu One gives you a capacity of up to 5Gb of storage space for free. This service provides the most comprehensive feature among the services Google Drive, DropBox, Box, and Sugar Sync.

In contrast to all the applications mentioned above, the Ubuntu One allows users to automatically sync photos and videos to personalize folders you may be in the Upload.
Ubuntu One Storage File onLine
Ubuntu One also supports the bandwidth limitation of download and upload speed settings. Just like sugar Sync, you can also see the devices connected to the Ubuntu One account. However, unlike the Sugar Sync is not limited capabilities through access to the browser but also through desktop and mobile applications
Read more >>

The New Ubuntu 11.10 ‘Oneiric Ocelot

8:39 PM

(3) Comments

Good news for Linux fans in particular the users of Ubuntu, has been waiting for has finally been released. The final release of Ubuntu codenamed Oneiric OCELOT 11:10 on October 13, 2011, Oneiric OCELOT is the 15th release of Ubuntu, and would be supported for 18 months for both desktop and server versions.
Ubuntu founder, Mark Shuttleworth chose the codename for Ubuntu 11:10 Oneiric OCELOT this. This name, according to Mark, described the cycle of 11:10 version emphasizes on two things, namely dreams and disiplin.Selain that, when interpreted word for word, "Oneiric", in Greek, meaning dream and "OCELOT" is a kind of wild cats that live in Central and South America.

Ubuntu does have a unique gift distronya name using the name of the animal. Similar to Android that each version uses the name of the dessert for breakfast.
11:10 Ubuntu is available for download from the mirror servers around the world, including all versions of the Ubuntu family (Ubuntu Destkop, Ubuntu Server, Ubuntuk Cloud, Kubuntu, Xubuntu, Lubuntu, Edubuntu, Mythbuntu and Ubuntu Studio).
Here are the main features and enhancements in Ubuntu 11:10

Key Features:

  • Unity 3D interface 4.22;
  • Unity 2D interface 4.12;
  • GNOME 3.2.0;
  • Linux kernel 3.0.4;
  • X.Org 7.6;
  • Xorg Server 1.10.4;
  • Upstart 1.3;
  • GCC 4.6 toolchain;
  • Phyton 2.7.2;
  • Compiz Fusion 0.9.6;
Additional Features:

  •     Increased beauty destkop; powered by Unity peluncurnya panel and which have now been ported to GTK3.
  •     Two methods of login; you can choose to use 3D or 2D interface.
  •     The new login screen; 11:10 Ubuntu is now using LighDM, a login manager that is lightweight and beautiful.
  •     Function key combination Alt + Tab new.
  •     Fourteen new wallpaper.
  •     The new Ubuntu Software Center; has been redesigned with a more professional interface.
  •     Mozilla Firefox 7; The latest version of Mozilla's popular web browsers.
  •     Mozilla Thunderbird 7; Manager emails from Mozilla that has now become the default email client for Ubuntu 11.10.     Deja DUP; new backup device.
  •     Support Multiarch; better compatibility for 32-bit architectures to 64-bit systems.
  •     Supports the ARM architecture; Just for Server version.
  •     Support multiple languages ​​for the script; Japanese, Chinese and Korean.
  •     Hybrid CD / USB ISO Images; possible to copy the ISO Images directly on a USB disk.
  •     Music new lens; associated with the Banshee application that facilitates the search for music locally and online


Read more >>

how to add a Repository

5:25 AM

(0) Comments


hello everyone, after a previous post, which of course also discusses ubuntu, this time I'll post how to add repository, this post I made ​​after looking everywhere finally stuck in his blog mas Boja, this post I created primarily to help rema
stering job and at the request of my friends, of course, with this I hope the friends linuxer better understand,and one thing I wanted to add thanks for Cambodia which already provides its ways, well just go ahead, that we want to add today the local repository for ubuntu 10.04Lts
Ubuntu - Ubuntu 10.04 comes with many packages that have been included with it.However, not everything we want or what we need we can get. Installer Ubuntu desktopversion, for example, has dilengkapai sharing of the application package, but usually is the application of a general nature. Then if we can not add their own applications that we
want? ... can certainly, way is to install an application package that we want manually.10:04 Ubuntu repositories has provided thousands of application packages that we can use. But to be able to install the application, it takes an internet connection to connect to the server Ubuntu repositories.

For users of Ubuntu 10.04 but has no direct Internet connection, you need not worry, youcan install the packages Ubuntu applications by adding their own local repository that you can save to CD / DVD or on your computer hard disk. All you need is a package ofextras Ubuntu 10.04, you can get by downloading their own way through the cafe ororder a CD / DVD extras Ubuntu 10.04. How to add your own local repository that? ..The following are ways you can try to do;


We will convey how to add
a local repository that is stored on a hard drive. Please copyall the extras Ubuntu 10.04 application package that you have into your hard disk, in this example we store it in/home/lab/lab-repos/ubuntu-10.04/
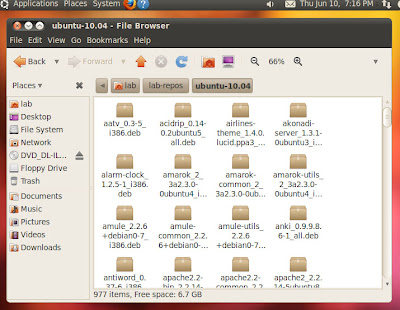
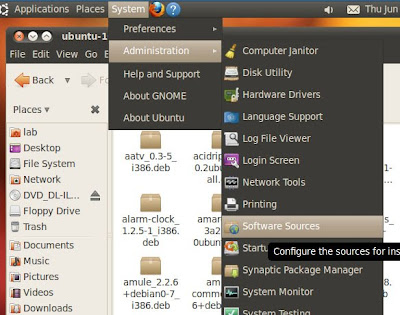
Next, go to system>Administration>Software Sources to run aplikasi
"Software Sources"...

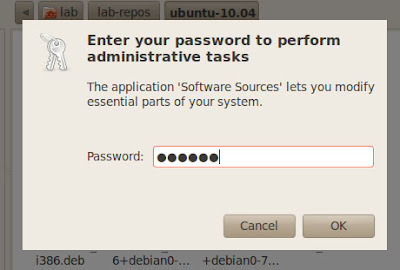
Please enter your password when prompted ...
Once the Software Sources window opens, please remove all the check checboxcontained on the tab "Ubuntu Software" (we assume you have absolutely no internetconnection). After that please you to the second tab "Other Software"
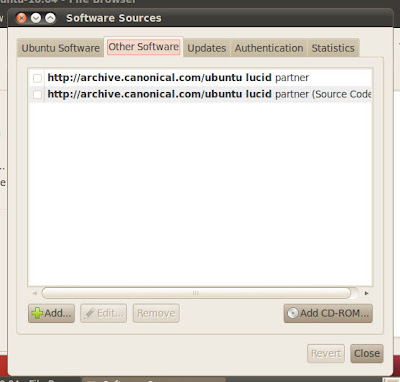
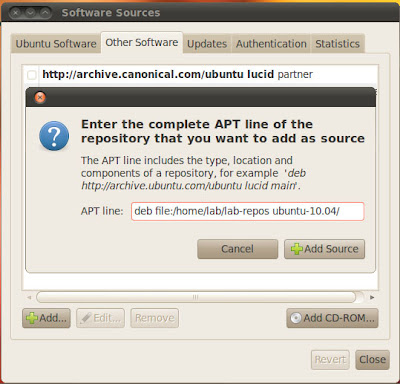
Add the source of new software by pressing the "Add". In the dialog window thatappears, fill with APT line like this ..
deb file:/home/lab/lab-repos ubuntu-10.04/

Adjust to the location where to save the application package extras that you have ... then press the "Add Source" to add ..
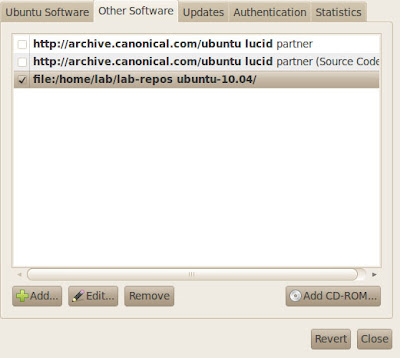
Source software has managed to add new. Press the "Close" to continue the nextprocess ...S
Next you will be asked to do a refresher on changes to the software source. Press the "Reload" to update the Ubuntu repositories ...
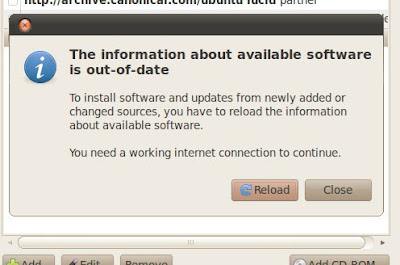
Application package that you just add will be loaded into a repository ... This will requiresome time, depending on how many packages you add. Please wait until thedownloading process is automatically completed and the window will be closed ...
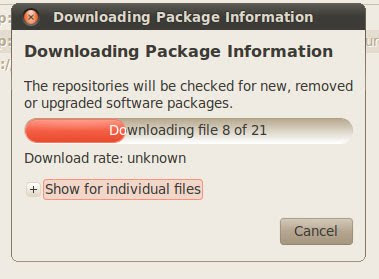
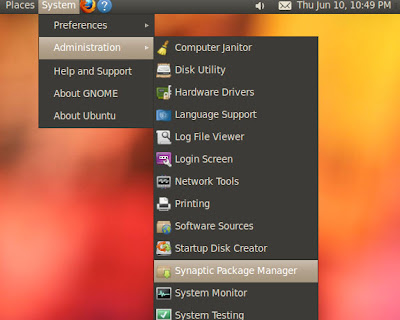
well .. now the local repository has been successfully added, now is the time to try to install the applications you want. Go ke System> Administration> Synaptic Package Manager to run "Synaptic" ...
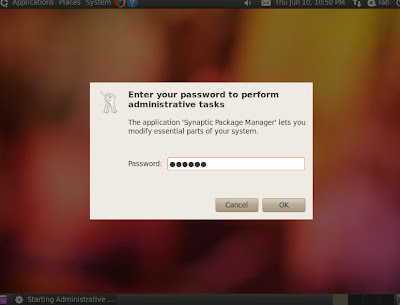
Fill in your password when prompted ...
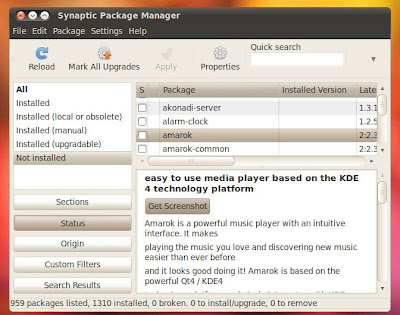
After Synaptic run ... behold, the application you want has been added and is ready tobe installed ....
Good luck ..
adapted from : Boja

Read more >>

How to remove grub at booting in ubuntu

12:09 PM

(1) Comments

hello everyone, well this time I'll post the problem actually is the problem I was having too, neh yesterday I installed ubuntu and unconsciously every boot there are many halpenting that should not exist but there is in our computer, well that's what I want to share to all my friends, well just go ahead without a lengthy

When your users dual OS (Ubuntu & Windows), it is common during the initial boot. There are 3 options grub that we do not really need. For that hopefully these tips can help. icon biggrin How To Remove Unnecessary Grub in Ubuntu

* When the picture is less clear, right-click on the image and select View Image.

The first step:

Boot into your Ubuntu operating system respectively. This time I use Ubuntu 10.04. If anyone is using Ubuntu above or below the version that I use, please adjust it. ^ ^

Open a terminal and type cd / boot /. After that, type ls. Will appear approximately as below.

langkah1 Cara Menghapus Grub Yang Tidak Perlu di Ubuntu
Step two:

Type cd grub /. See the picture below.

screenshotcjzevencjzeve Cara Menghapus Grub Yang Tidak Perlu di Ubuntu
Step three:

Type sudo cp grub.cfg grub1.cfg just like the example below. prompted her to enter the superuser password. Please fill in your login password. icon biggrin How To Remove Unnecessary Grub in Ubuntu

langkahbackup Cara Menghapus Grub Yang Tidak Perlu di Ubuntu
Step four:

Please delete the script that I've marked with a black block. Make sure you remove the script is right yes.

langkah4 Cara Menghapus Grub Yang Tidak Perlu di Ubuntu
this is too...

langkah5 Cara Menghapus Grub Yang Tidak Perlu di Ubuntu
Dan yang ini…..
langkah6 Cara Menghapus Grub Yang Tidak Perlu di Ubuntu

The final step:

When you are sure you have removed 3 block of script that I am black as above, press Ctrl + X. Then Enter.

Hufftt ... finally over. It's time trials. You can restart your computer from the Restart menu or directly typing the command sudo reboot in the terminal. Good luck ...

adapted from Duniainternet

remove grub ubuntu, ubuntu how to remove grub, remove grub, how to remove grub, remove grub in ubuntu, remove grub, remove grub ubuntu, how to remove ubuntu os, how to delete group diubuntu, remove os in grub


Read more >>

how to change of the boot log on ubuntu 10.04

9:02 AM

(0) Comments


hello all, after my posting about a tutorial, how to install, setting before, today I want to share with friends how to replace the image when the computer is on logout, well this post I can from the web maketechier, after a long surfing everywhere finally I met with a blog that provides enlightenment and finally finished as well, which I use ubuntu here is ubuntu 10.04, which I think is easy to be modified, well just go aheadThe latest version of Ubuntu (10:04 Lucid) comes with a theme plymouth That allows more cool and animated screen to be displayed During boot up. While this is a great improvement, it also means That all the previous method of setting your own boot screen and login screen is no longer valid. For Those Who Are not happy with the default boot and login screen, here is how you can change in Ubuntu Lucid Them. At this moment, there is no GUI to handle this, so everything has to be done via the command line. Follow closely and you'll be fine.


Changing the login screen

1. Move your favorite login wallpaper to your Home folder. Make sure That it is of. JPG format.

2. Move the wallpaper to the wallpaper directory system. In the terminal:

sudo mv ~ / your-wallpaper-name.jpg / usr / share / backgrounds

3. Activate the Appearance window upon login
sudo cp / usr / share / applications / gnome-appearance-properties.desktop / usr / share / gdm / autostart / loginwindow
4. Close the terminal. Log out of your current session. At the login screen, the will of the Appearance window shows up. Go to the background tab and select your favorite wallpaper as the background. (If you can not find your favorite wallpaper, click Add. You Should Be Able to find your wallpaper in the / usr / share / backgrounds directory).
5. Your login background will instantly change to the wallpaper you have selected. Now login to your desktop.

6. Open a terminal. Type the following command to deactivate the Appearance window upon login
sudo unlink /usr/share/gdm/autostart/LoginWindow/gnome-appearance-properties.desktop

Changing the boot screen

The plymouth theme uses a theme framework to display the background and animation, so you won’t be able to take a simple wallpaper and put it on the boot screen. The Ubuntu repository comes with several plymouth themes that you can install in your system.

sudo apt-get install plymouth-theme-*

This will install all the plymouth themes in the repository.

Next, select the theme that you want to display:

sudo update-alternatives --config default.plymouth

you will see a list of the theme for you to choose. Type in the number of the theme you want and press Enter.

lucid-plymouth-selection

Update: According to Pvalley67, you have to run the following command to update the system. I have got it working without having to run the command, but you can do it if you are not seeing the new splash screen.

sudo update-initramfs -u
Restart your computer. You should see your new boot screen in action.
adapted from : maketecheasier

Read more >>